Monday, February 25, 2013

A new way of cleaning / dusting your model trains...

Hey all,

A few weeks ago a member of the Digitrax group on Yahoo posted about using a special product called Cyber Clean to clean his dusty and / or dirty model trains.  I think any modeler can relate to the difficulty of trying to clean intricate and detailed models with a cloth or a feather duster.  Well, I picked up a jar for about $7 on eBay, and it showed up last week.  On Sunday I decided to give it a try...

Here is the product in question.  It's a 5-oz jar, about the same size as a Play-dough jar.
The material is a 'putty', similar to the stuff kids play with called 'slime'.  The idea is to press this material onto the item you are trying to clean, and then pull it off again.  Dirt and dust is supposed to stick to the Cyber Clean and your item is supposed to come out shiny as new without a lot of time and labor.

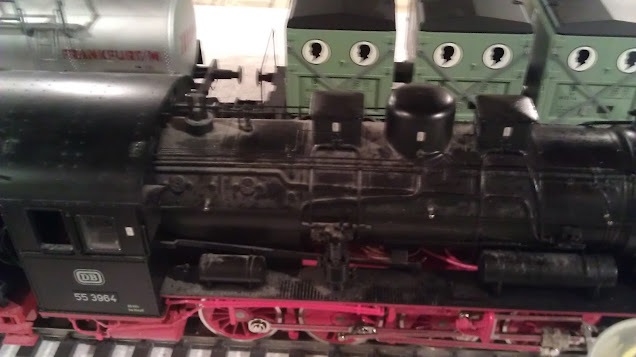
The locomotive I chose to use is a Marklin BR55.  I have been using this loco throughout the construction of Carstenbahn One, so it has experienced its fair share of dust.

Yes, a perfect candidate!

The material is a little firmer than I had expected.  If you are dealing with a model with a lot of very small added parts or fragile lines, this may not be the best solution, as you do need to give it some pressure to push it into the tightest spots.  In any event, I would recommend that you do not force the material into all the cracks and crevices, but hold it gently but firmly against the model, and let the material slowly ooze its way into the details.
So here is the rear section of the boiler after about five minutes' work.  Compare this with the 'before' image and you can see the dramatic difference.

I also tackled the tender.  The imitation coal on the back would be an excellent test, since it's a BEAR to try and clean with a cloth, and this product seems perfect for it.
Again, here is the 'before' shot.  As you can see, short of pulling the body off the chassis and putting it in the dishwasher, it would be very hard to get this clean.
Instead, a quick five minutes with Cyber Clean and the tender looks much, much better.

Cyber Clean has some of the same issues with getting into corners and creases that one would encounter with a rag, and it does absolutely nothing for any serious dirt or stains.  However, to get the dust out of the tight spots on only semi-fragile models, it works well.  It did a nice job on my BR55, and I look forward to using it on my dusty Neuffen station building I've had out of the box for close to twelve years.

For the paltry sum of $7 including shipping, it's worth having this handy product around.


Thursday, February 21, 2013

... which brings us to today...

Whew, that was some operation, porting all my old posts over!  It's amazing to look at the dozen-year journey my love affair with this scale has been.  My family and I have been through a lot in the past decade, but like the line from Frankfurt Höchst to Königstein, the ups and downs are part of the charm of the ride!

Well, that brings us to today on the development of Carstenbahn One. This past week I put some polyfoam roadbed under the tracks to get ready to start building scenery.  I also took delivery of my KM-1 BR50, which had been sent to Germany for repair nearly six months ago.  Here is a quick 1-minute video of some of the trains on the layout:

More work above and below the track

<Written December 2012>

Christmas saw a lot of running of the trains, but not much work on the layout.  I played around some more on the digital control of the trains, managing to blow up a few expensive components, and learned how to program routes on the IB Switch.  Now, for example, I can hit one button on the IB Control and both switches on the outer-to-inner track crossover throw in sequence, and I can even have signals go from green-green to green-yellow to show the engineer he has to slow down at the same time.  I also hooked up one of my semaphore signals and added a Marklin slow-down module to it.  Now, when my BR55 comes around the corner into the Hoechst station, it begins to slow down when the signal is red, rolling gently to a stop in front of the signal.  The gentle sound of a steam locomotive at idle continues (yes, it has a Loksound XL decoder in it) and smoke continues to churn from the stack.  Amazing, at least to me.

To wrap things up for 2012, here's a short video of my BR55 pulling the boxcar train through the S-curve.

The first trains run

<Written November 13, 2012>

The ‘big day’ arrived quite unexpectedly.  I had started cutting the roadbed for the raised track areas on Sunday, and the process went much faster than I had anticipated.  Monday night I cut the last piece, and by Tuesday I was ready to lay the track back down.  Marklin’s rail joiners are not very good, so they also offer track clips that hold everything together.  The clips take a while to install, but with the help of a fellow Marklinist, Adrian Wegener, we were able to get the rail joiners installed.  At around 7:00 p.m. the first train made its way around the layout…
That’s a train of gondolas being pulled by a pair of BR80’s running tail-to-tail.  They are my only analog locos, and I expected the track to be dirty, having been out of use for many years.  But thanks to a quick swipe with a track cleaning brick, the trains ran almost flawlessly that first time around.  The double-heading insured that if one locomotive found a dead spot on the track, the other one would push it through, and then the front one would pull the rear loco through the same spot.  Neither locomotive had been run in a while, and I’m sure many of my readers can relate to the wonderfully comforting smell that came from the locos as the old motors burned off dust for the first few rounds.  Ah, the memories of my youth!

I wasted little time in unboxing every freight car I have and making a couple of long trains.  I hooked up my Intellibox to a transformer and unplugged the analog trafo.  My class 55 steam locomotive was hooked to a boxcar train I put together, while one of my V100’s took up position in front of the string of gondolas:
As I had suspected, the S-curve, initially an uninvited guest in the track plan, has quickly become my favorite part of the layout.  Sure, the curves are much too tight to be realistic, but I still enjoy the effect, especially when two trains pass one another. 

Risers, benchwork, and tables, oh my!

<Written November 12, 2013>

Okay, so after some additional work, the roadbed for the trains is finished.  I installed risers on the benchwork that sits below the track level and cut plywood for the track to sit on.  Here is an example of how that looks:
 As you can see, the risers will allow scenery to dip below the tracks on either the front, back, or both sides. 

Okay, I guess that, thanks to the blurred train cars and the light on the locomotive, it’s obvious what comes next…

The main line benchwork is finished!

<Written October 2012>

The benchwork is DONE.  Here are some photos of the completed benchwork.  I have laid out the track in roughly the locations that they will be when the layout is done.  The track lying on the lower sections will be on plywood on risers to allow the landscape to be contoured in front of and behind the track.  There are now more trains in the staging yard to see how long they can be.  The sidings in the staging yard are disappointingly short.  So far that’s my biggest disappointment.  I’m guessing when trains finally roll I’ll be using the sidings to store extra cars instead of automating a switching-off of two trains per track.
Above is the view from the same angle we’ve seen twice before.  The section on the right has been shifted about four inches right to make room for the right-most metal post.  Note the lower sections of benchwork on the left side.  Again, here the tracks will be on risers to allow me to have depressions in front of the track.
Above is a picture from the opposite corner of the image above it.  There is an 18-inch gap between the layout and the wall for access to the backside of the staging yard.

Above are a couple views of the staging yard.  The sidings are so short I'm tempted to revise the track plan yet again to try and accomodate longer trains on the sidings.

Here’s a nice view of the S-curve.  I can’t wait to see how this looks with a long freight train traversing it!
Finally, here is a view of the Höchst station.  In the original track plan, I put the station on the curve.  In the revised plan, I pulled the station tracks to the right side and along the edge of the layout.  This allows the station tracks to be longer.  I liked the look of the station on the curve aesthetically better, but the station tracks were very, very short.  This new design will allow me to someday have passenger trains with the longer 4-axle passenger cars stopped at the station.  At the top left of the photo above you can see the switch that will go to the branch industry (I’m planning on making that a brewery, but we shall see) with the white boxcar sitting on the end of the line that will eventually snake up to the Königstein station which will sit behind it, above the staging yard which in the picture is occupied by trains.

The first of the benchwork is built

<Written August 2012>

August saw sporadic activity vis-à-vis Carstenbahn One.  I picked up some key control elements, like an IB Switch to go along with my Intellibox, some pieces for the Loconet buss I plan to run around the layout, and other bits and pieces necessary for train control and operation.  But nothing was going to be controlled if I didn’t have a layout to run trains on.  So in late August I got out my miter saw, picked up some one-by-three inch furring strips, and began cutting.  Within a week, I had much of the benchwork completed.
I laid down some track provisionally to make sure everything fit as it should.  I also threw a train on one of the tracks in what will eventually be the covered / hidden staging yard to see how long the sidings in the staging yard would be.  Alas, they aren’t as impressively long as I would have liked.  In HO scale, each track could hold a full-length ICE3.  In 1 scale, even a modest freight train is too long, and the passenger trains would need to be very, very short.  Well I suppose you can’t have it all…

Here is a view of a train on the siding of the outside track of the staging yard which will be covered by the Königstein branch station.  Although I have a total of 13 of these gondolas, my class 55 steamer can only fit in the siding with seven of them…

Revising the old track plan

<Written June 2012>

A month has passed without any change in the status of the layout.  My original track plan (above) was simply not going to fit in the new space because of the door on the left side.  I finally pulled up my sleeves this month and began a redesign of the plan that featured an ‘L’ shape to allow access to the back storage room.  Happily, I found I could come forward into the room an additional 3 feet, so the new layout could be 21 feet long versus the original 18-foot design.  Plus, I could still take advantage of 18 feet of width along the back wall, so the ‘Königstein’ portion (that’s the disconnected part at the top of the old track plan) of the layout could be built as I had designed it back in 2002.  Here is how the track plan for the main line looks with the new dimensions (both plans show 3’ gridlines):

Although I’m using the unrealistic Marklin 1050mm and 1176mm radius curves, I decided that was better than ending up with nothing more than a huge oval.  I like the sweeping S-curve that the L-shaped layout now requires, and hope the curves look good in that part of the layout.  I think this will be a focal point for the layout, too.  On the track plan above, there are two curves coming off the Höchst station area branching to the left which are unconnected.  The top one is the branch line leading up to Königstein, while the lower one will lead to an industry, possibly a brewery.   Like the original design, the Königstein line will make a long S-curve to gain altitude, coming across the main line.  Königstein itself will sit atop the four-track staging yard at the top of the track plan.

My initial layout design for Carstenbahn One was built with a table-top concept in mind, using 6-foot by 3-foot tables mentioned earlier in this blog.  I still like this table design, and since I wanted to make this layout semi-transportable (I do plan to move into a house nearby with my family in the future and want to take the layout with me) I decided to keep this concept.  I did choose, however, to modify the design by building a portion of the layout using an open benchwork technique, where the tracks sit on a roadbed above the benchwork which allows for more realistic land contour.  Roughly a third of the layout will be built using this method, with the other two-thirds (the staging yard, Königstein and Höchst station areas) built on regular tables.  The biggest challenge will be that, when the layout gets moved, the scenery will need to be cut at the seams between modules and repaired once it arrives at its new home.  Of course, depending on the available space at the new location, modifications might be necessary, anyway.
Here is the track plan again, showing all the tables and which sections will be done using open benchwork (the ones with the striping).  I also did a rough sketch of the brewery siding and the Königstein branch, and added the tunnel portals for the area that will be hidden below the Königstein station area.  The plan for Königstein is identical to the old plan.  One challenge in moving from HO to 1-scale is having to live with fewer options for operational activity.  Right now I have one siding in Höchst at the brewery, and one in Königstein (the others are in locomotive sheds).  So operations will be minimal.  Still, I’m happy with the new design.  Now it’s table building time…

Rebirth!

<Written May 2012>

The building you see above is the Chrysler World Headquarters building in Auburn Hills, Michigan.  This building is a small part of the larger structure, the Chrysler Tech Center, or CTC.  It houses about 12,000 employees, mostly engineers and engineering support staff. 

“What on earth does this have to do with 1-scale trains?” you ask…  

Well, as fortune may have it, in the Spring of 2012 I started a position in the marketing department at Chrysler.  This was to signal the beginning of the rebirth of my dream of building a 1-scale indoor layout.  You see, Chrysler headquarters is quite far from my home, but happens to be very close to the home of my parents.  It made sense that I would stay with them during the week, going home on weekends and holidays.  What my parents have in their home which I don’t is a large empty basement, one begging for a 1-scale train layout.  My father, who is also enthusiastic about model trains, had no reservations about my taking over the basement, and my mother encouraged me as well.
The picture above shows the space available to me.  For reference, the tables propped against the wall in the back are three feet wide and six feet long.  The space happens to coincide with the track plan I designed nearly ten years ago quite closely.  The exception is the door you see on the wall to the left.  This door goes to a storage room, and needs to be accessible for moving larger boxes and other items.  Also, you can see the post just to the right of it, plus two others in the center of the basement, which I also needed to consider.  No matter how I try, I can not come up with a way to use the original track plan in the available space.  Redesign time.  <Sigh>

Talking Dirty...

<Written in early 2005>

In December of 2004 I finally finished a two year project by completing the Vollmer Neuffen station in 1-scale.  It's massive and beautiful, and looks even better thanks to some gentle weathering I did on the model.  The box cover shows the bright green rain gutters, shiny red walls, and pristine platform.  In addition, the windows have no window treatment, and a reasonably close inspection shows an empty shell.  Well, although I didn't go nuts and give the station full interior detail, I did hide the insides, and spent considerable time weathering and painting elements of the model to improve the appearance.
In the midst of my weathering I can to a point where I had completed the weathering but had diluted flat black paint (my weathering material) left over, and no convenient way to store it right then.  The solution?  Find something else to weather.
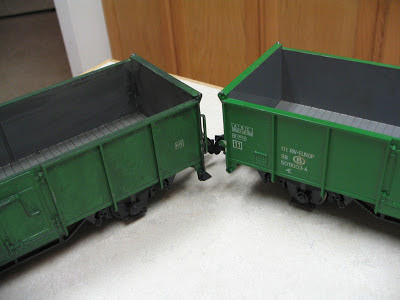
Here are the "victims", two gondolas from the 60's and 70's, dozens of which are easily found (yes, I know, the Belgian one not so much),  I picked the 5850 gondola, and, holding my breath, started painting.  I brushed on the mixture and wiped it off quickly, using up-and-down strokes with a cloth to get the excess paint off.  The result?  Not a bad weathering job, and only about ten minutes' work...
Here is the freshly weathered, grimy dirty, and infinitely better looking car as compared to a yet-to-be-soiled model.  I did end up painting the car in the background, too, and found that by diluting the paint more I could simulate less grime, while thicker paint stayed on the car more, giving it a grimier appearance.  The car in the front is the "second grimiest" car I made.
Next up was the Belgian version.  I had always enjoyed a mixed consist of the older and newer German (brown) gondolas with a few green (Belgian) ones thrown in for good measure, but the bright green was hard to take.  Taking brush in hand, I sacrificed a green one to this experiment...
Some difference, eh?  The one on the bottom isn't exactly in the newest condition, yet still looks too shiny and clean compared to the mildly weathered upper one. 
Finally, here are some more comparison shots of the two models...

And there you have it, a prototypically correct grimy train!  I finished all my gondolas (9 of the older style) in about two hours.  I also tried to weather the newer ones, which changed their color a bit, giving them a bit of a gray hue.  I suggest using a pretty thin (two parts thinner to one part paint) wash for the newer style.  My next step will be to prepare coal inserts for these cars to finish my coal train.  Then if I could just get to building a layout and run these models...

Get a little closer...

<Written in early 2003>

As I have continued my exploration of 1 scale I have discovered many things that, in H.O., never really bothered me much, but in 1 scale they become much more painful to look at.  One thing that caught my attention in early 2003 was the distance between the 1-scale cars I had been collecting, notably the Marklin freight cars.  The distance between the buffers is over three-quarters of an inch, completely unacceptable.  I was not a big fan of the prototypical couplers, as I wanted to be able to couple and uncouple at will without it taking several minutes and painstaking labor to do so, so that solution was out of the question.  
I quickly realized that, since the freight cars were designed to negotiate 600mm radii, I could probably get away with much closer couplers, since Carstenbahn One has a minimum radius of 1020mm.
Thanks to some suggestions on Huebner's website, I was able to devise the following solution, which is applicable to the "newer" Marklin freight cars with removable couplers and sprung buffers.  I'm working on a solution for the older cars, but that's still in the works.  In the meantime, here is my quick and easy solution to close[r] coupling on Marklin 1 scale freight cars... 
Here is our candidate, a Marklin boxcar on the same standard frame as almost all their other freight cars.  Besides the car, you will also need a small Phillips screwdriver, a jeweler's flathead screwdriver, Marklin M-track (or C-track, I suppose) screws, and 5/32 and 1/16 drill bits.  First step is to remove the coupler, achieved with the Phillips screwdriver.
With the coupler off, it's time to make some modifications to the car.  
First we drill out the square opening for the coupler with a 5/32 drill bit.  This is done to give the head of the screw enough space to go in all the way.
Using the other hole as a guide, drill into the "rear" of the slot where the coupler used to be with the 1/16" drill bit.  You only need to go in about a half inch.  When you have completed this step, simply reinsert the coupler, but instead of sliding it forward into the slot, just insert the screw from the outside through it and into the "rear".  The screw will pull the coupling head towards the rear of the coupler pocket, not the front anymore.  If the coupler wants to pull forward because the screw threads are grabbing it, just ream out the coupler hole with a 1/8" drill (I just used the 1/16" bit and worked it around a little).
Here is how things should look when you are done: 


These are "before and after" pictures.  Notice where the coupler sits now, at the back of the socket...
That's it!  You are done!  For three minutes' time and a few simple tools (and one screw), you have improved the appearance of your freight consist.  How much improvement?  Judge for yourself:

Here are two more "before and after" pictures.  Note the dramatic improvement in appearance, even with my lousy photography...


Finally, here is a comparison of the modification in a 1020mm radius curve.  Note that the outside buffers are indeed touching, and are, in fact, slightly compressed.  There is still some additional compression possible, so the design does not increase the danger of derailment.  Instead, it has proven to be a simple and effective way of approving the appearance of your Marklin freight cars.

Wednesday, February 20, 2013

Carstenbahn Zero-Point-Five

<Written in June 2002>

With a barbecue for the Great Lakes ETE Chapter looming and sufficient tables finished to set up a few trains, I decided to put together a temporary layout in the garage.  It wouldn't be Carstenbahn One, as I don't yet have enough tables or tracks for that, but it would be enough to run some decent-length trains when the train guys get here...
This was the first layout, taking about two hours to put together.  Okay, it's not the massive Carstenbahn One layout, so I have affectionately dubbed it "Carstenbahn 0.5".  The six tables were arranged in a square configuration, which took up about one-and-a-half stalls of our two-stall garage.  The track plan was a simple pair of circles with a passing siding on the outside circle.
Here is another view of the first layout.  The station in the foreground is the Piko "Goepplingen" station.  It looks a little small when compared to the locomotive shed.  It is actually the shed which is the wrong scale.
Later that weekend (and at night, obviously) I changed the shape of the layout to 9' x 15' to not only allow space for one car to be in the garage, but also because I wanted some longer straight sections, and something less of a circle.  This layout shape seems much better. 
Again, I made two circles of track.  The outside circle is digital, while the inside circle is analog.  That beautiful BR78 belongs to Marc Gesink, a fellow ETE member and Marklin fanatic. 
Here are the two digital trains ready to head out.  I have now installed sound in both, thanks to the expert advice Jun Maeda has on his website.  Having the train layout in the garage like this offers two advantages.  First, there is a decent amount of space to enjoy a nicely-sized layout.  Second, if you make the layout big enough, it's impossible to get at the garden tools, so you are unable to do yard work!

Train Table Tutor

<Written June 2002>
With the track plan done, it was time to build some tables for the layout.  The stipulations were many: the tables had to be light to be carried around, they had to be strong enough to hold up one-scale trains, they had to set up and come down easily, and they had to be cheap.  I determined that strength wasn't really an issue- tracks and ballast are light.  The tables merely had to resist warping in the middle.  I decided that a simple framework of 1x3 pine would suffice.  These are screwed together, resulting in a frame that looks like this:
Next up is the tabletop.  I chose 1/4" OSB, or pressboard as it is sometimes called.  For my application, the appearance wasn't an issue, but light weight was critical.  In retrospect, there is too much bowing of this type of wood to be effective.  I plan to replace those sheets of OSB with something firmer.  Still, at only $6 for a four-by-eight sheet, it was an inexpensive experiment.
Note:  If you have the lumber yard or home store cut the sheet down for you, be sure to save the extra pieces, as they can be used for additional tables.
Another view of the frame and OSB.  I assembled the frame on top of a sheet of OSB to make reasonably sure that the frame was square. 
I used some scrap 1x3 material to make corner braces to help maintain the frame's shape.  These also double nicely as mounting points for my cheap table legs, which I will talk about next...
I considered commercial foldable metal legs, but at $15 a piece the legs alone would cost over $800!  I also considered wood legs, but I wanted something that was easily removed, so this also seemed to be a poor solution.  I finally decided on using 1/2" diameter pipes and flanges, with caps on the ends to protect the floor.  The result?  $6.57 for a relatively sturdy and strong table leg.  Not only is the leg easy to remove (just unscrew it from the flange), but the table height is readily adjustable.  If I wanted to have the trains low for children to play with, I could simply replace my 3-foot legs with two-foot legs.  Anyway, here is the hardware: 
And we're done!  Feel free to try this yourself if you are interested in a simple train table.  It won't allow flexibility in scenery like an open benchwork design, but for temporary setups, you can't beat the convenience or the ease of storage.  Also, don't hesitate to ask if you have any questions.  In summary, here is a list of hardware, and prices I found at the local home store here in Ann Arbor:
Item Description
Cost per Unit
Quantity Required
Extension
36" 1/2" i.d. pipe
$2.97
4
$11.88
1/2" pipe flange
$2.77
4
$11.08
1/2" pipe cap
$0.83
4
$3.32
OSB / Press Board
$6.26
1
$6.26
1"x3"x6' pine board
$1.95
4
$7.80
Total Cost


$40.34 (plus tax)

Additional materials you will need are 10 screws at least 1.5" long, and glue and/or short screws for the table top (I use both).  I didn't add the cost for those, because they are relatively cheap.  In addition, after you cut your third 4' x 8' sheet of OSB, you will instantly have enough wood for two additional table tops from the scraps of the previous three tables. 

The Carstenbahn One track plan takes shape...

<Written May, 2002>
After countless hours of designing the track plan on WinRail, I finally start Carstenbahn One
May, 2002:  Okay, call me ambitious, call me a lunatic, call me Ishmael, whatever.  I finally decided on a track plan for the one-gauge layout I plan to build.  I had been working with WinRail for months, and was very pleased with the results.  Unfortunately, I quickly realized that 1 scale is juuuust a bit bigger than H.O., and even the simplest of track plans had no chance of ever fitting into the remaining space in my basement.  I decided that a modular layout, built up with four-by-eight tables, was the only possible solution, and I could set the modules up either in the garage or perhaps at our church, or try and find a building owner in Ann Arbor who would be willing to loan me some space.  I kept working on a design that included the basic track plan of the station at Königstein near Frankfurt until finally I came up with this:

That's Königstein at the bottom, and I built a simple loop with passing siding for some operational activity.  Those are four-foot squares, so the whole shebang was sixteen feet square, which would easily fit in the garage.  I have my heart set on modeling Königstein, so that alone dictated this size.  However, I was concerned with the short platform length at K-stein, plus the fact that a train would make the circuit in less time than it would take to reverse the train and send it out again.  Well, the more I looked at this layout, the less it appealed to me.  I re-measured the garage and realized that I could actually go a bit wider, to about eighteen feet square.  I also realized that carrying four-by-eight foot tables up from the basement was almost impossible, and that these tables would simply be too big for any kind of modules.  Since I had already decided that I had 18 feet at my disposal, the logical step was to redesign the layout for tables three feet by six feet.  The resulting layout design looked like this:
This is it, the final version of the Carstenbahn One track plan.  I turned the reverse loop into a full loop, added a second track to make a typical German double-track main line, and I elevated Königstein to sit above that line (in the picture above, just imagine the K-stein station area moved up to connect the two disconnected tracks).  The plan allows for nice main-line runs of longer trains, plus some switching operations at both ends of the Königstein spur.  The drawback?  Those squares are all three feet, so I will need to build FOURTEEN tables to realize this layout!  Not only that, but I need to find a place to store all this when it isn't set up!  My wife Jennifer is pretty supportive when it comes to my trains, but to ask her to park on the street for the next few years, and invest hundreds of dollars into insulating, heating and air-conditioning the garage?  Not a good move in happy-marriage-land.  They'll have to be cheap.