Tuesday, November 19, 2019

Four Years...

Well, it has been four years since I last posted.  However that's not to say there hasn't been activity.  It started with the Ramcke family moving into a new house.  We're now downriver, in a small house located wonderfully close to an active railway line.  In fact, here is a sample of what I get to enjoy pretty much every day when I walk the dog:


"But Carsten," you say, "What has become of Carstenbahn One?"  Well, that's a good question.  Turns out I'm not the only one who moved.  My parents have also moved, and to Florida.  The condo in Auburn Hills is sold, and as you can imagine, the Carstenbahn One layout is no more.  On the bright side, the new house has a fully-finished basement, and there is a good spot for a modest 1-scale layout.  You would think that, after four years, there would be a bunch of progress and I'd be able to show off pictures of trains running around a layout in similar condition to the Carstenbahn One layout in my parents' basement (after all, that was four years, too).  Well, actually the space was a basement for our daughter for a couple of years, so I have only recently begun to build.  However I'm pleased to provide some progress and share some information on the new layout.

First, a picture of the available space, roughly 21 feet x 18 feet:

See that table in the back?  That's actually one of the frames from the original layout.  Although the space is significantly smaller, I used all the benchwork in the new space.  I built the new layout's benchwork using two 3x6-foot sections for every 6 feet of the new layout.  One 6-foot section to be used for stabilization and storage, and the other as the actual layout benchwork:

The bottom then gets covered by a sheet of plywood and acts as a storage shelf for boxes, tools, stored trains, etc, while the top contains the actual track (the entire layout will be built using an open benchwork concept). 

I designed a pretty optimistic track plan, in that it is a triple-level dogbone main line, with a station on the top level featuring two passing sidings, a small yard and a branch line three-track station staging yard.  The first level down from there is a two-track staging yard and one of the dogbone returns, along with a parade section that goes down to the bottom level, which is the other end of the dogbone and a three-track staging yard. 

I laid out the tracks on the tables, at least for the two staging yards, to see how everything would fit:

The post-it notes in the image above show the necessary elevations for each section of track.  I was surprised to find that I could go with a reasonable 4% grade on most sections of the layout, with 5% necessary in just a few places, and always on straight sections.

Finally, here are a few more images of the benchwork with the tracks provisionally laid out.  First, the raw layout:

Next the three-track staging yard on the bottom level.  The diagonal track that represents the 'return' of the dogbone is not laid out, as it crosses the center of the layout.  The two tracks on the outside of the staging yard (on the far right) represent the ascending tracks from the staging yard to the intermediate level parade line and top level station. 

In the image below you can see a curved track ending at the edge of the table near the top-center of the photo.  This is the return of the bottom level of the dogbone.  That track, and the one at the start of the staging yard (not visible) make up the two tracks on the inside of the left side of the benchwork in the image below.  That one 'lone' track on the outside left side is one of the two that will make up the parade line, which is actually the next loop of the two tracks next to it. 

Finally here is a view of the benchwork where the bottom-level staging yard sits.  Note the cut in the benchwork at the top of the image to allow access to the egress window:
I know the explanations above are confusing, but will try and post the actual three-level track plan in the next blog entry.

More to come, hopefully soon!


Saturday, January 2, 2016

2016 Resolution: More Fun with 1 Scale!

Happy New Year, everyone!  It has been a while since I last posted.  I'm hoping I can spend more time with 1-scale in 2016 and provide more information here in my blog than I have the last couple of years.  Luckily the past few weeks have been active for me in the King's Gauge, thanks largely to a package from Lokshop containing some Loksound L decoders I'd like to use for upgrading my old Marklin locomotives, largely thanks to the new ESU magnets.  But I'm getting ahead of myself.

Many of us 1-scalers have older models with the AC motor that aren't very conducive to upgrading to digital.  That has changed thanks to ESU's production of the 51965 magnet, a permanent magnet to replace the field winding on the older Marklin motors.  What it does, in fact, is turn the AC motor into a DC motor, which then allows us to add a decoder and have a modern digital locomotive with all the bells and whistles (pun intended) of their contemporary counterparts.  I have two such locos, a BR80 steam loco and a DHG 400.  The BR80 will be getting synchronized smoke along with sound, and since that's a more involved process I'm going to start with the DHG diesel, which is getting a digital upgrade with sound only (okay, and maybe some fancy lighting upgrades, too).  Here is a picture of our candidate:

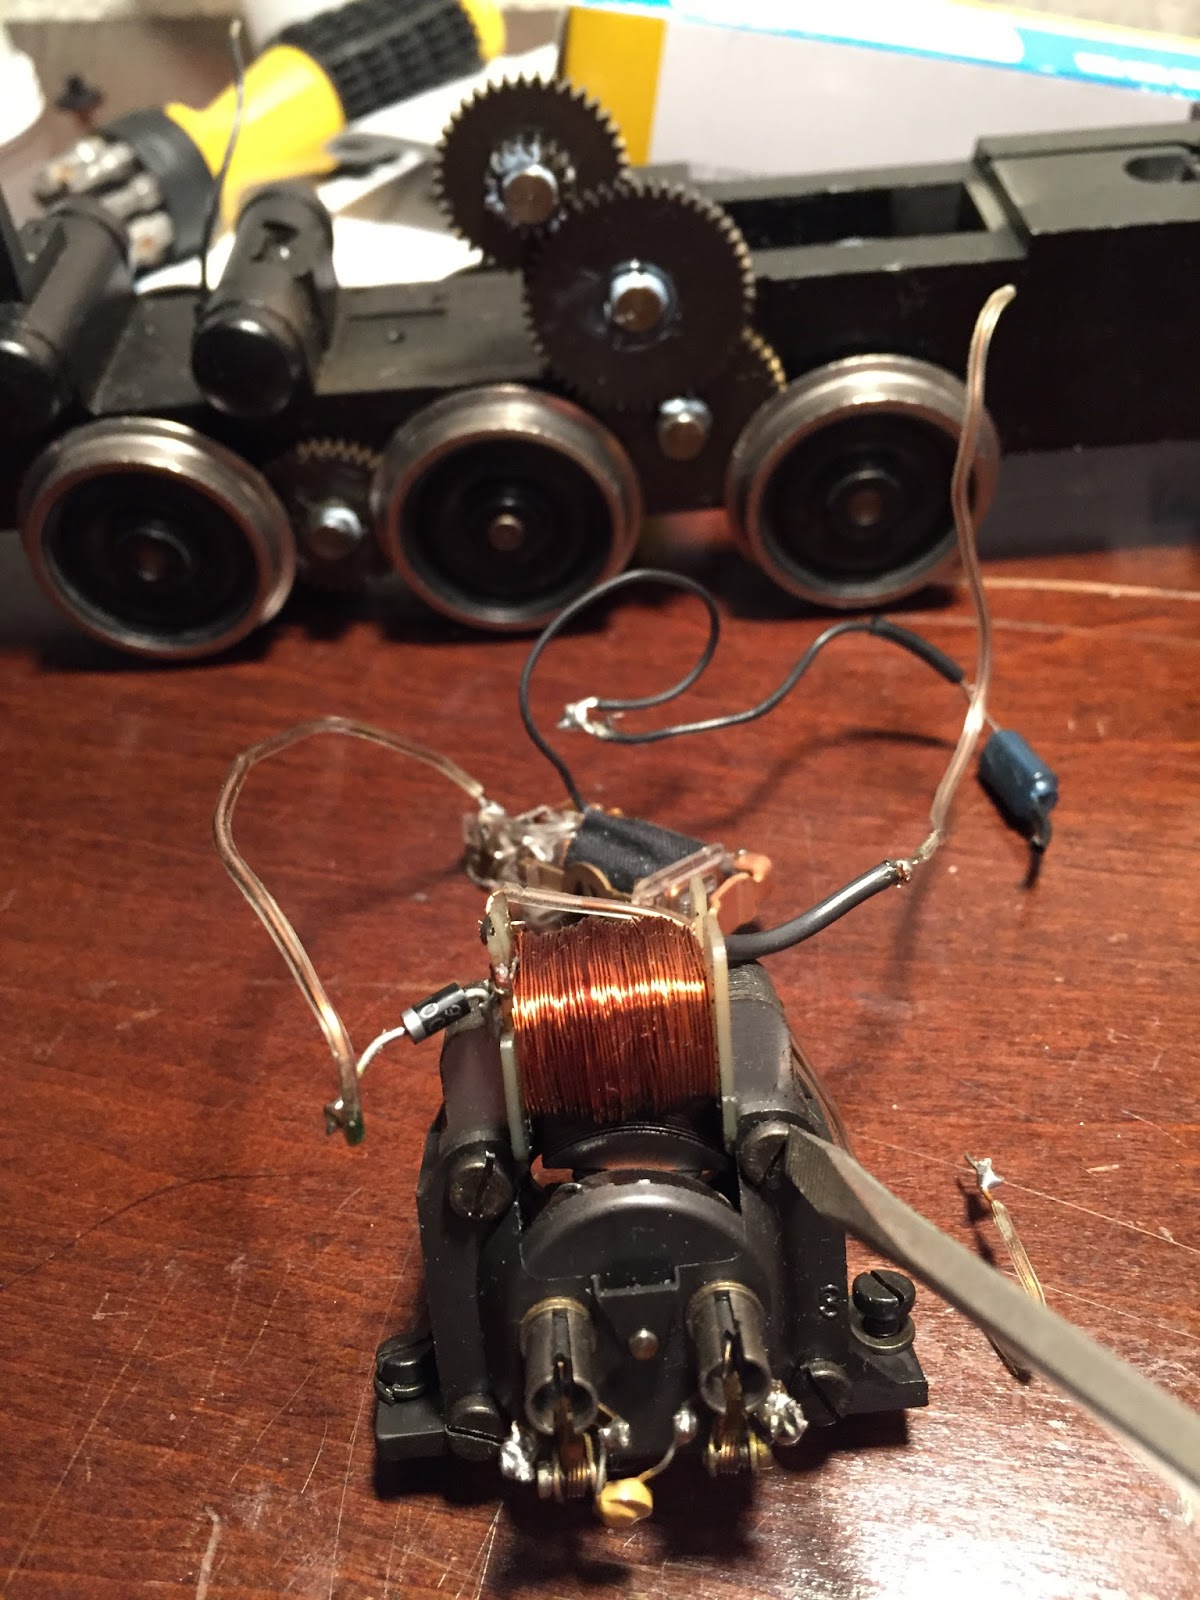
Below is a picture of the inside of the locomotive after the three screws holding the body on are removed.  There is some wiring that have done but no worries.  Everything is coming out- the reversing mechanism, the motor, etc.  Now is a good time to lubricate the gears, too...


The first step of the upgrade is to replace the field winding with the new permanent magnet by removing the four screws and taking the motor apart.  You'll need a nut driver to hold the 5mm nut while you turn the slotted screw (the four screws are visible in the image below with my screwdriver on one of them).  Frankly, for me that was the toughest part of the job, as I was using a 7/32 nut driver, which is juuust about the right size, and Marklin has made sure those nuts are on TIGHT...

 Below is a picture of the three pieces of the motor (and the brushes) once the four screws are removed.  In the background you can see the packaging for the ESU 51965 permanent magnet.  It's really a simple swap from here- take the old center section out, replace with the new magnet, and you are ready to reinstall your new (DC) motor.

Here is how everything looks when the motor is reinstalled with the permanent magnet.  Note the lack of coil and wires.  Don't forget to snip off the noise suppression diode between the motor poles, which is still partly visible in the picture below.  Compare this picture to the image of the motor two pictures above- what a difference, eh?  There are now only TWO wires connected to the motor and the whole reversing solenoid mechanism is gone.  Plenty of room for a decoder, speaker, and even some additional modifications...

Last picture for today:  I hooked up leads from the chassis and wheel pickups to the two sides of the motor and test-ran the locomotive using DC power.  It ran flawlessly.  Next I will install the decoder with sound, and maybe add a few other special upgrades...

More to come!  

Tuesday, July 7, 2015

Out With the Old, In With the New...

In a previous post I talked about finally replacing my Marklin V200 which I had to sell many years ago due to a financial crisis.  When I purchased the 'new' Marklin V200 I have to admit that I was a little disappointed.  Although the technology of digital operation and detail level on models has come a long way in the decade or so since I first purchased the V200, I was surprised at how little Marklin had upgraded on the re-release of their V200.  The headlights were the same yellow LEDs as before, the sound functions were only modestly expanded, and the model had changed little in terms of detail.

Well, it turns out that an O-scale manufacturer in Germany has begun 'dabbling' in the King's Gauge.  Modellbahn Werkstatt, or MBW for short (http://mbw-1zu32.de/) released the V200.1 about six months ago.  The price was very reasonable, and a sale on remaining inventory last month encouraged me to place an order.  By selling my Marklin V200 on eBay I had enough money to order the MBW model complete with a Loksound XL 4.0 decoder.  Anyway, enough text.  Here are some pictures of the new model:


I particularly like the design of the V200.1 versus the Marklin prototype because of the 'beefier' nose of the locomotive.  


In the photo above you'll notice the new signal tower, which I will blog about in the upcoming weeks.


The new V200.1 makes a good impression in front of my FD train.  


Overall I'm very happy with the model.  The detail is significantly better, the sounds are more realistic, and the functions and features of its digital operation are a step above the Marklin model.  My only complaints are that the model lacks an engineer in the cab and that from a sound standpoint the bass that the Marklin model had, that throaty rumble that a diesel locomotive should have, is missing on this model.  Perhaps a speaker swap or enclosure design is in the future.

Tuesday, April 15, 2014

The last big box arrives (for a while, at least)

The new V200 looked rather silly pulling a handful of freight cars around the layout.  Seriously, a proud express locomotive relegated to a local freight?  Not cool.  So last week a big box arrived, the last I will see for a while (lottery win notwithstanding):

Yup, that's an HO scale V100 on top of the box...

One train car I have always loved is the AR4üm-54.  This dining car is more well known by its nickname, the 'Kakadu', so named because of its bright red and blue colors.  Marklin has recently reintroduced it in 1-gauge.


Lucky for me, I can create a prototypical train with my V200 and a Kakadu dining car.  It's called an F-Zug, a precursor to the Intercity train system in Germany and the inspiration for the Trans Europe Express trains.  These exclusively 1st class trains ran with minimum stops and with strong motive power from the 1950's through the 1960's.  The picture on the cover of the book below is the closest thing I could find to the train I want to model, a short F-Zug:


So after waiting nearly a year since ordering them, my F-Zug cars arrived, and yesterday my V200 finally had a train worthy of its status:


 It occurred to me shortly after I ordered the coaches that I had no idea if they could negotiate past another train on the parallel curve.  So, holding my breath, I parked a long freight train on the inside trach and sent the new passenger train around the sharp S-curve:


   I'm pleased to say that the two trains do not touch anywhere as they go around the entire layout.  Although I can't run these long passenger cars on both tracks and not have them touch when passing each other, the combination of one freight train on the inside track and my F-Zug on the outside track avoid any problems.

Whew!

Monday, March 31, 2014

Koenigstein starts coming together...

Hey everyone,
It has been a long time since the Carstenbahn One blog was updated.  I suspect there will be some additional updates in the near future as I step up some other projects, but today's post is about laying the benchwork and the track for the Koenigstein station, the end point on the branch line...
You can see the branch line coming in from the left.  This is the first of the three six-foot-by-three-foot tables supporting Koenigstein.  I spent last night getting all three boards installed.  The main line passes below.  In the shot you can see the KM-1 BR50.  In retrospect I should have moved it before I stared working on the table above it, lest something fall on it!
 here is a view from the 'end' of the station.  In the back of the picture you can see the branch line coming in from the left.  The track at the front right is the 'dead end' of the branch line.
Here is the two-stall steam locomotive shed, located in front of the incoming branch line.  It's the Marklin 1-scale model, 5617.  I repainted much of it.  I'll add a blog entry that talks more about that, but here is a picture of the original for comparison:
Below is what the original looked like in the 1980's.  Obviously neither shed is close to the original, so maybe at some point I'll attempt to scratch-build something, but for now I'll stick to the Marklin model.
Looking in the other direction on the layout you'll find the larger railcar shed and maintenance building for the diesel railcars that run to Koenigstein from Frankfurt.  In the 1980's this was a three-track shed, which has since been expanded to four tracks.  I used a modified version of the Piko locomotive shed and made a two-track version.
Again I'm kitbashing three of the Piko 63003 kits together to create this long shed. When completed it should be able to hold the longest train cars and locomotives I will ever own. I have a little more work to do to get this model finished.
Above is a shot of the current shed.  Again, it's a mch different design than mine, as was the 1970's version.  But sacrifices must be made...
Here is one last shot of the steam locomotive shed at the 'west' end of the station, if you use the orientation of the original.  A freight depot will sit next to the siding on the right.  Stay tuned as more of this comes together!

Friday, November 8, 2013

A new locomotive!

Many years ago a financial crisis in the Ramcke household forced me to sell my Marklin V200.  Last week it was replaced.  Below is a picture of this beauty making its way around Carstenbahn One.  In a month or so I should receive matching D-zug cars.  Woohoo!


Tuesday, August 20, 2013

"There she blows!"

“There she blows!-there she blows! A hump like a snow-hill! It is Moby Dick!” 
― Herman MelvilleMoby Dick

Since as long as I can remember, there has been a Marklin 1-scale model that has eluded me.  Sure, I have seen it on occasion on eBay, but I have always been outbid, or the price was simply too high for me to be able to pay.  But I have always been on the lookout for this elusive boxcar, and like Captain Ahab's obsession with Moby Dick, I have chased it across oceans.  I'm happy to report that, finally, after ten years of searching, bidding, hoping and disappointment, the coveted 'Milka' boxcar is mine.
 

The Milka boxcar was only produced in 1989, and as a limited production model.  A good friend of mine in England who regularly attends the 'Wormser Spielzeugauktion' noticed this boxcar, along with two others, in untouched condition in the auction listings in July.  Since he was attending the auction already, I asked him to enter a bid on my behalf.  Sure enough, I won the lot.


Now, perched on the freight siding in the Hoechst station on Carstenbahn One, I finally have my Milka boxcar.


Is that it?  Is my car barn complete?  Can I now be satisfied with my collection of some twenty unique boxcars?  Oh, if only it were so.  For as Herman Melville puts it:

“As for me, I am tormented with an everlasting itch for things remote. I love to sail forbidden seas, and land on barbarous coasts.” 

- Carsten