Thursday, September 29, 2022

Well, Sh*t...


The Beneken 1-scale BR151 Heavy Freight Locomotive in original green livery

Beauty is in the eye of the beholder.  What some may consider to be one of the ugliest locomotives of the Deutsche Bundesbahn happens to be one of my favorites, the BR151 heavy freight locomotive.

The image above is a 1-scale model from the company Beneken, a model that would be completely out of my price range.  However Marklin has just announced that this locomotive will be produced in 1-scale by the Göppingers.  The list price is set at over $3000, but I'm sure it will be available for less. Normally I could inhale deeply and bite the bullet, but a pet peeve of mine is seeing a pantographed locomotive run without overhead wire.  This means that I would need to add catenary across all visible tracks on Carstenbahn one.  That's a cost that starts at about $50 a mast, btw.  Ugh.  Maybe the upgrade to the AV receiver will have to wait.

Anyway, I thought I would share this dilemma of mine.  But as my wife used to tell our daughter, "You can have anything you want, you just can't have everything you want."


Wednesday, May 25, 2022

Carstenbahn One, Where Have You Been?

 Yup, months and months since I posted, and a LOT of time between posts.  It has also been a long time since I did any work on the layout.  Well, okay, it's been a long time since I did any work on that layout.  

What you see in the image above is a trio of modules from the Great Lakes Chapter of ETE's modular layout.  The module with all the tracks, grass and ballast is part of the staging yard from the chapter's old layout, while the two modules in the foreground are new approach modules for that staging yard.  You see, for the past six months, I have been focused primarily on the ETEGL's modular layout, and with our first exhibit looming in just over two weeks' time, things are progressing at a hectic pace.  

A pair of newly-built corner modules for the ETEGL's modular layout

If you'd like to learn more about the ETEGL and our modular layout, feel free to visit the website at www.etegl.org.

Thursday, February 3, 2022

Elevating the Experience

 One thing that bothered me on the former layout was that the curves were flat, while there is usually some 'banking' on real railway lines, especially in Germany, to provide more comfort for passengers on trains traversing the curve at a decent speed.  When I first laid track, I figured it wasn't 'a big deal', and didn't bother to look for a solution.  But over time, that little detail began to bother me as I watched trains enter and exit curves.  Again on the new layout I initially decided that super elevated curves weren't really necessary, and I left them out of my planning. But again, over time it annoyed me, so it was time for a solution.


The images above show the only location on the layout in need of super-elevation.  It's where the trains come out of the tunnel, and where the last of the curve straightens onto the parade section.  I won't be super-elevating the curves approaching the station, because trains are speed restricted in the station area already.  


I picked up some N-scale roadbed made by Woodland Scenics at the local hobby shop.  I figured it was thin enough so I could experiment with multiple pieces, it's flexible, and will even help with some sound dampening.  


Here you can see the roadbed, provisionally placed under the track.  Initially I tried placing a pair of roadbed pieces on top of each other, but the banking was too extreme.  After all, I didn't want this to look like a modern TGV line with trains running at 300 kph through the curve.  So this is the modest banking I decided on, using a single strip of N-scale roadbed.


With the piece of N-scale roadbed now installed, you can see how the locomotive has a gentle 'lean' to it when compared to the first pictures in this post.  I also super-elevated the other track, and the results are exactly what I was hoping for as trains go into and come out of the curve.  

The next step has already begun, at least in a test phase- the ballasting!  Stay tuned...  

Wednesday, October 20, 2021

Proper Signal Status through Digital Magic

 Okay, I may be 'overselling' this blog post via the title, but this is something that has annoyed me for a long, long time.  And that's when certain signal aspects appear and when they change, something not easy to model on a railroad that features semaphore signals.  

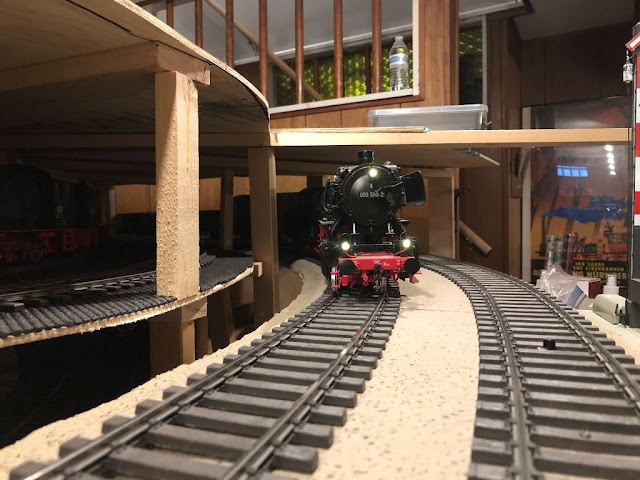
The photo above shows the Swiss CE6/8 II waiting for the signal to change so it can proceed.  The shorter signal with the orange circle directly in front of the taller one is the advanced signal, which tells the train driver what the next signal 'down the line' is showing, in other words, telling the train driver whether to expect to stop or expect to proceed.  The home signal behind that one protects the track directly ahead of the train, and indicates to the train driver whether they can proceed into that section of track or not.

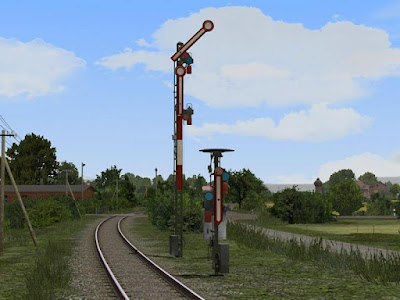
Mechanical signals, in this case semaphore signals, are operated using long cables (at least two, one for 'halt' and one for 'proceed' for a two-aspect signal) that run from a central location in the station or a small hut out on the railway line to each and every signal.  Pulleys, tensioning mechanisms, and guides are used to guide the cables to their destination, which can be a respectable distance away.  The image below shows a few tensioners, big weights carefully designed to make sure the cables are always taut.  You can see the cables in the image near the ground if you look closely, and a set of cable guides near the bottom left-hand corner of the image.  


When you think about railroading using semaphore signals, you have to imagine the poor guy (or gal) in the signal house / tower having to throw those big heavy levers to change the signal aspect.  It's not like modern light signals that operate automatically or with the push of a button.  Also, the signal operator then needs to let the next signalman up the line know a train is approaching, and also let the 'previous' signalman know that the train has passed, so that signalman knows the track ahead is clear for the next train.  As such, there are some operational effects that I discovered are fairly difficult to mimic in model railroading.  Specifically:

 1) Signals don't automatically switch from 'stop' to 'proceed' as soon as the block (the section of track to the next signal) ahead is clear.  Instead, they switch when the block ahead is clear and a train is expected.  In actuality, the signalman gets the notification (by telegraph or phone) that a train just left the previous station and is headed their way.  That would be their trigger to throw whatever levers were necessary for switches and signals for that train's arrival and/or departure.

2) In most cases, individual levers control advanced signals and home signals.  So they would not move at the same time.  The operator would need to throw one, then the other.

3) Semaphore signals don't necessarily go back to 'Halt' the second the train passes.  The signalman will likely have prioritized cranking the railroad crossing gates back up first, or notifying the switchmen both ahead and behind them of the train's approach and clearing the previous block of track.  

4) Although the advanced signal should not be thrown to 'halt' as soon as the train has departed but only when it reaches the next block, signal operators would generally throw the lever for the advance signal right after throwing the lever for the home signal to 'halt'.  The same goes for the advance signal if the track ahead was clear.  Easier to do them together, I suppose.


Given those conditions, it's pretty hard to make a realistic simulation on a model railroad.  That is, unless you have software that can accommodate, which I do.  The easiest part was to simulate the time it takes for the signal operator to throw one lever, walk over to the other lever, and throw that.  Thanks to having 51 different sensors all being read by the computer and software, I can have the home signal throw to 'halt' a little while after the train has passed, and then have the advance signal throw to 'halt' when the train reaches the next sensor, about another five seconds later.  That takes care of items 2, 3, and 4.  Item 1 is achieved through conditional operation in the software.  Basically you tell the software, "turn the signal green only if a train just entered the previous block (by tripping a sensor) and if the block of track ahead of the signal is clear."  

When I completed the programming for item #1 I began to discover other applications of that kind of logic.  Stay tuned for a future blog where I discover how to use conditional logic to have certain train categories stop in the station and others not, plus automatic station announcements based on train activity...  


Friday, June 25, 2021

Let There Be [Smart] Light...

It has been nearly half a year since I last posted, but work on Carstenbahn One continues!  Since purchasing TrainController I have been spending a lot of time learning the software and creating schedules for my trains.  I have also had to spend a considerable amount of time 'derail-proofing' my trains, as the steep grades and sharp curves are giving me trouble.  

But I've also been playing around with other layout features.  One in particular, lighting, has been on my list for a while.  In a few of the layout pictures I have shared you can see the track lighting and cans that I use to light the layout.  After playing around with the Philips Hue smart bulb technology I ended up buying a half-dozen smart bulbs, replacing the 'regular' lightbulbs in the fixtures above the layout.  Using the Philips Hue app on my phone, I am now able to change the color and brightness of the bulbs, either individually or as a group.  The result?  I can simulate all sorts of lighting 'scenes'.  

Here are a few examples:


I took the photos above with light streaming through the egress window so the colors are a little washed out, but you can imagine what I was going for- evening, morning, and night.  

I then used a third-party app called iConnectHue that allows macros (sequences) to be written using those different lighting 'scenes'.  The result?  I can now run a day-to-night-to-day simulation and trigger it on my cell phone.  I have a couple of 'versions' of this sequence, one that takes about two minutes, and another that takes about six minutes.  It all depends how long I want to stay in the dark 😉.

I went a little overboard, and now have smart bulbs in every light fixture of the basement.  Another macro I wrote will now fade out all the other lights in the basement before the nighttime sequence on the layout begins.

The next challenge will be to have the streetlights on the layout and lights in the buildings come on automatically as 1:32 day turns to 1:32 night...


Saturday, January 2, 2021

What a great year 2020 was!

"Carsten, you have lost your mind!"  This may be what some of you are thinking as you read the title of this blog entry.  But for the topic of this blog, namely my continued work on my 1-scale layout, 2020 was amazing, at least in terms of the progress I made.  Here's an image from about a year ago:


Yup, that's the lower staging yard (henceforth known as the Lower Schattenbahnhof, or LSB) as it looked in January 2020.  A year later I am done with the benchwork, have all the track laid, and that Schattenbahnhof is now buried three levels deep under other track!

Even though I haven't added entries into the blog since September, work has continued, with a flurry of activity in December.  First, I completed installation of almost all of the reed switches on the layout.  There are a total of 51 of them now installed on the main line, and I will likely install a few more on the freight yard sidings.  

There are four Digikeijs DR4088GND feedback modules connected via CAT6 cables to the Intellibox.  The 51 reed switches around the layout are part of 17 individual blocks, three sensors per block.  The blocks are arranged around the layout like this:


What you are seeing above is an image of the track diagram I created in TrainController software, which I am now using.  LSB is the lower Schattenbahnhof, USB is the upper Schattenbahnhof (staging yard / hidden station).  I know, the terminology is a mix of German and American English, but then so am I!  Note the trains situated in the staging yards and on the layout.  Pretty cool, eh?

Aside from the work with wiring up all those reed switches I have been buried in the manual of TrainController Silver, the package I have purchased.  An upgrade to Gold may be in my future, too.  But for now, Silver does everything I want it to do- assuming I figure it out!  The learning curve is steep, but there is a large online community that has been very helpful.  It has also been lots of fun watching the software follow trains around the layout!

Three trains are ready to depart the Lower Schattenbahnhof (LSB).  With TrainController I suspect I will have between 4 and 6 trains running at any given time, with three more on sidings in the two staging yards.  

Is that a new siding?  Yup, I decided to liven up the south end of the station with a short siding that will be used for loading lumber and other goods onto appropriate freight cars.

Okay, more coming soon as I continue to play around with the software and begin what is hopefully the track ballasting and scenery work!

Happy New Year, all!

- Carsten


Thursday, September 24, 2020

Let the Fun Begin!

 My wife is an over-the-road trucker, which means she doesn't make it home more often than about every three weeks.  Her visits to the basement are even more infrequent.  However this past weekend she was quite interested in seeing the progress I had made on the layout.  She followed me down to the basement and gasped in astonishment when she saw how much has been accomplished.  I smiled broadly at her admiration.  This she followed up with, "Okay, so?"  "So what?" I retorted.  "So let's see it run!" she demanded.  This was followed by, "And why does the big steam locomotive not have any cars behind it?"


I really hadn't spent a significant amount of time running trains, and certainly there were some trains that had been prone to uncoupling and other maladies, including the afore-mentioned 'big steam locomotive', my KM-1 BR50.  There were plenty of trains on the layout, but mostly for show, and for making the blog entries look like <ahem> everything was running fine.  Well, this was going to be the test.


At some point she left and went back upstairs.  Me?  I was too busy managing the throttles of the Intellibox to notice her departure.  She had opened Pandora's box.  In no time I had four trains running around the layout simultaneously.  Thankfully the trains stayed on the track and remained coupled.  I kept gasping in horror as several times two trains appeared to be ready to collide.  But the truth was, there were no collisions, not even close.  In fact, even with four trains running simultaneously there is enough distance between them thanks to the long main line that, not only did I not have to constantly adjust throttles, but the layout itself didn't seem overloaded.  Until I get used to operating the layout my mind will continue to assume that the small layout space means trains are close to colliding.  But the truth is, the main line would be over 150 feet long if it were laid out straight.  That's a train roughly every forty feet.


Running trains has become a daily occurrence, and I find it to be an amazing stress reliever.  Here are a couple of pictures from today's operating session:

The BR50 is pulling a coal train (well, a string of empties until I create coal inserts) while the V200 and it's FD-Zug wait for the signal to turn green.  The BR50 is headed from the parade section down into the bottom staging yard, while the FD-Zug is going to be entering the station above it as soon as the signal changes to Hp1.

The signal turns green for the FD-Zug 'Gambrinus' just as the last coal car passes the block signal.  The Big diesels in the V200 are roaring to life and the locomotive is about to move...